


Used with permission from the Baltimore & Ohio Railroad Historical Society
Ed Bommer
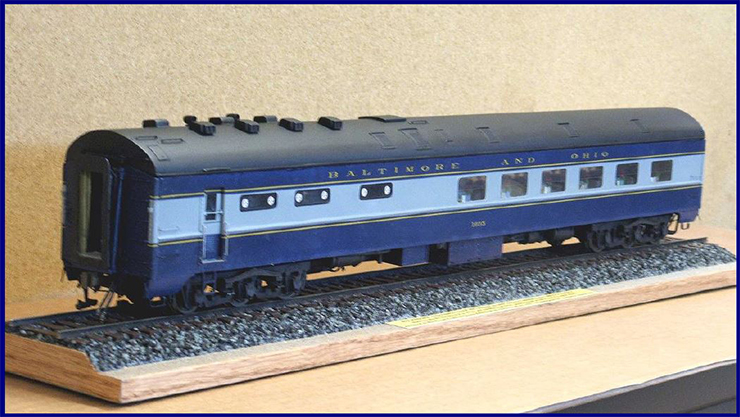
SCRATCHBUILDING B&O CLASS F-4BC DINING CAR 1035 IN O-SCALECALE
BY EDWARD F. BOMMER
PHOTOS BY AUTHOR EXCEPT WHERE NOTED.
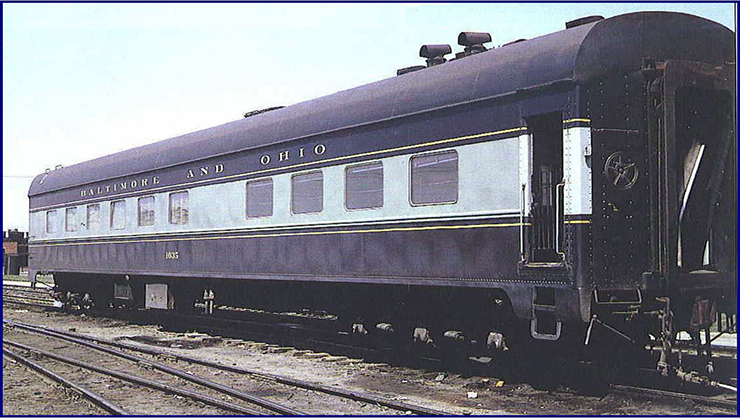 B&O No. 1035 at Willard, OH, April 17, 1966 by Dave McKay, from B&O Color Guide to Freight and Passenger Equipment, used with permission of Morning Sun Books
Introduction and History
A B&O Railroad Historical Society director asked if I could build him an O-scale model of the dining car that was assigned to the Royal Train of Queen Elizabeth II in October 1957. This was in 2004, I think, at the B&O RR HS convention in St. Louis when I showed a scratch built O-scale model of B&O baggage car 627 (B&O Modeler Vol. 1 No. 3, Nov./ Dec. 2004).
B&O 627 was Class B-8aa that had been assigned to that train. I agreed but said there were other projects planned which had to be done first. Years passed. Family and health issues delayed things. In the summer of 2010 I finally got started on the dining car. Then there was more delay because of moving to another place and the need to build a workshop there. Finally, the car was delivered in March, 2012.
Rather than write on how you could build one just like it, I thought a review of the steps and techniques used in scratch building and detailing this car might be more helpful for work on other models. One could still build a model of B&O 1035 from this if they wished, using the basic dimensions in the B&O diagram I also used.
B&O 1035 was one of several ‘Colonial’ heavy-weight dining cars built by the Pullman Company for the B&O in 1923. Each diner was named for a colonial period woman of note. Car 1035 was originally named “Betty Zane.” She was a young Revolutionary War heroine whose family lived in the far west of the 1770s, near what became Wheeling, WV. Classed F-4, in subsequent years these “Colonial” diners underwent a number of upgrades and modifications with the result that few were exactly alike by the 1950s. Car 1035 became Class F-4bc, the only member of its class.
Air conditioning was installed in car 1035 during the mid-1930s. The interior was refreshed by the early 1940s. It was equipped with seating for 48 at the time, due to war traffic. New fluorescent lighting was also installed in the dining area. In 1946 the Mount Clare Shops overhauled, stream-styled and modernized the 1035 which had lost its name before the war. Although updated, diner 1035 kept its original Stearns cast iron coal burning range and broiler. The original Bohn iced refrigeration was retained as well, being less expensive and easier to service than mechanical refrigeration.
At first assigned to top B&O trains, diner 1035 and its sisters by the later 1950s were becoming surplus. The number of B&O passenger trains needing dining cars was declining. Still, B&O held some of these heavyweights in good condition as substitutes for the newer dining cars when needed.
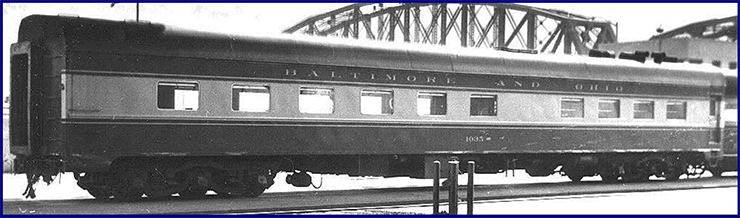
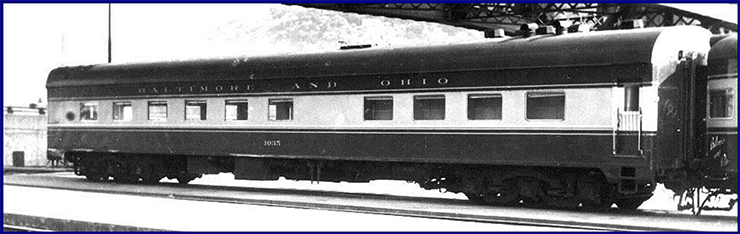
Assignment to a prestigious special such as for Queen Elizabeth II, her retinue and the press in the fall of 1957 would see diner 1035 put into the Royal Train and diner 1056 (the former Nellie Custis) with the Press Train consist. The story of these trains is in the Fourth Quarter 2004 Sentinel. By 1968, B&O was retiring the heavyweight diners, car 1035 included. Here are a few photos of it taken around that time.
The following three photos are from George Ellwood’s Fallen Flags website and were taken by Bob Rathke at the B&O’s Grant St. Station in Pittsburgh under the Liberty St. Bridge in June of 1965; used with permission.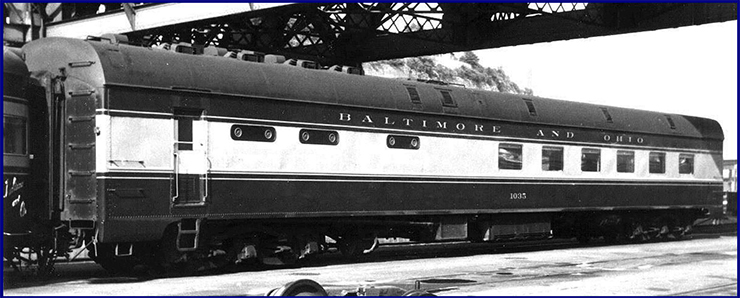
Body Construction Procedures
To build a reasonably accurate model, plans are needed as well as good photos showing both sides and the ends of the same car. Ideally, there should also be close-up photos of important details. To build the diner, this dimensioned B&O diagram for the 1035 was the only plan available, but at least it gives the critical dimensions and does include quite a bit of detail.
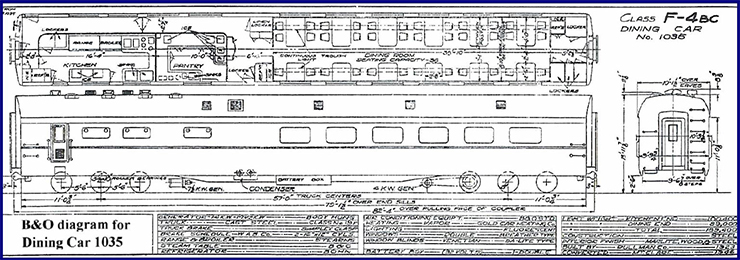 From ‘B&O Railroad Co. Diagrams of Passenger Equipment Updated to 1958,’
TLC Publishing, Lynchburg, VA
From ‘B&O Railroad Co. Diagrams of Passenger Equipment Updated to 1958,’
TLC Publishing, Lynchburg, VA

Photo 05. Materials were the next item. Making use of an old O-scale dining car kit would not work because of the unique way B&O modernized the sides of this car. Scratch made sides would be needed. Also a piece of milled wood arch roof stock was needed. It had not been made since the 1960s, but I found a piece that was still straight and true. Here it’s being cut to length and the angles trimmed on both ends.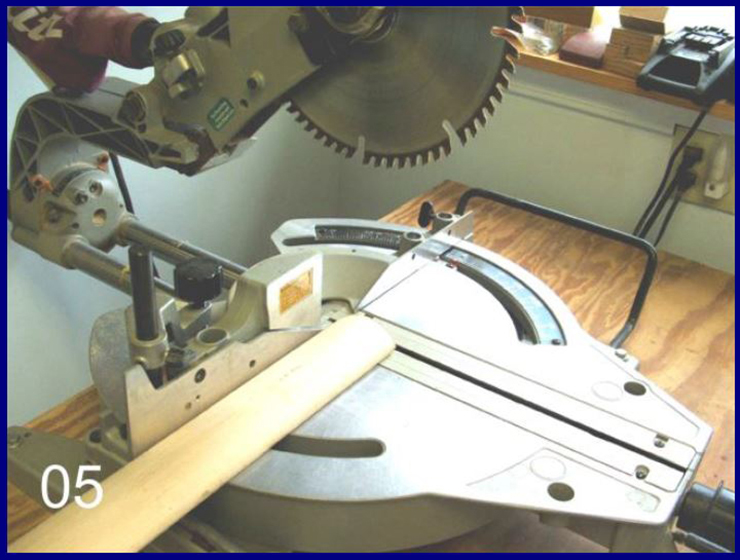
Photo 06. The car sides were cut from aluminum roofer’s flashing. It’s important that all cuts be absolutely straight, square and even, end to end. The sides were cut about 1/64” wider than measured against the cast metal car ends, because a belt line must be impressed as well as a row of rivets along the lower edge. Doing that makes the sides slightly narrower.
Photo 07. A jig was made for embossing the belt line on the car sides. First, a side was clamped against a straight edge parallel to the groove cut into the board. A wheeled tool used in repairing window screens was rolled over the groove to impress a slight bend in the side. It was then flattened by hand. The resulting bend mark was placed over a heavy wire set into the groove on the jig. A grooved roller impressed and defined a raised bead for the belt line. To further sharpen edges of that bead, an angle cut piece of wood was pressed and slid along both sides.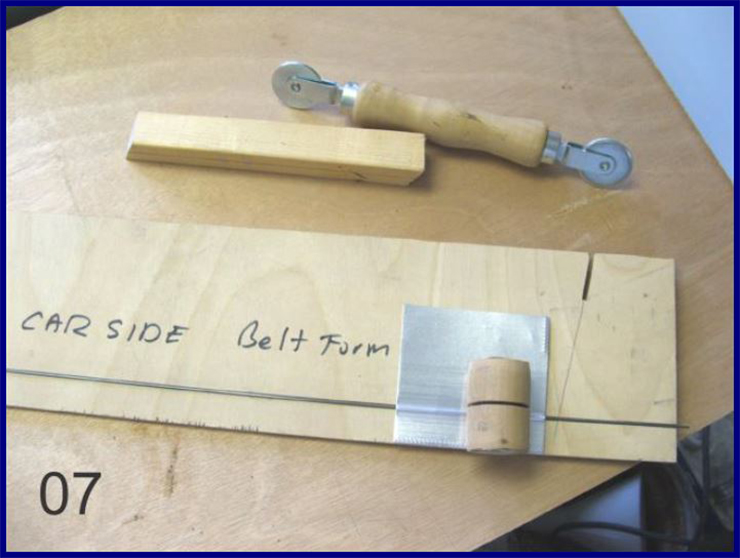
Photo 08. Here, both car sides have been cut and embossed. A pencil line tentatively shows the top of the windows.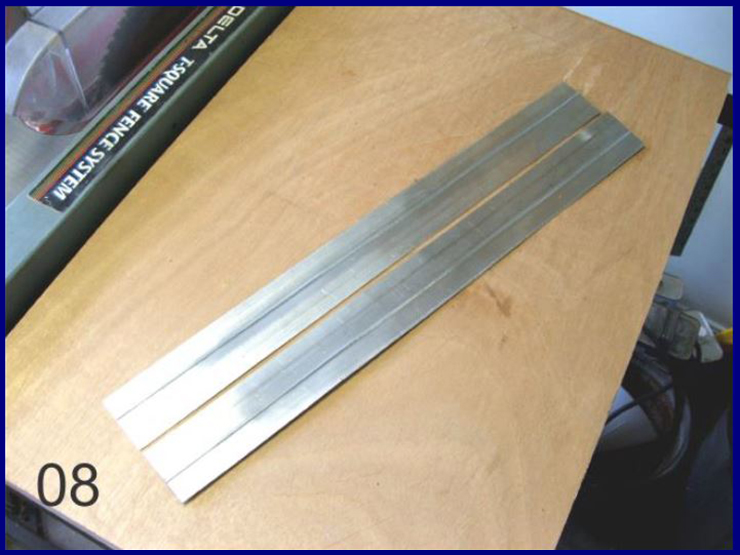
Photo 09. Matching up the car’s floor, roof, ends and sides is next. The car ends are cast metal parts from Keil Line. Pullman type ends were used. They were modified for the diner by filing off ‘ears’ at the top, where a clerestory roof would attach to the car end. This diner has a round roof instead. A machinist square is essential to make certain the body parts fit perfectly square and true before they are permanently assembled.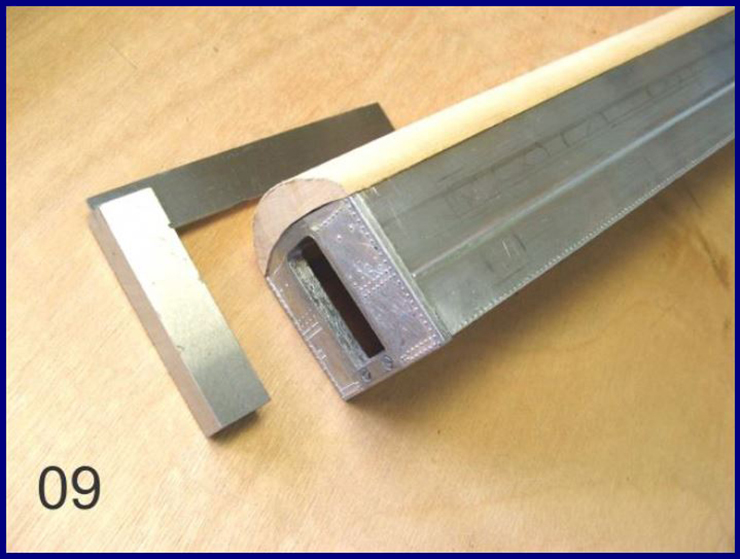
Photo 10. Because wood was used for the car floor, roof and basic under fame, six coats of sanding sealer was applied. Rub downs with 0000 steel wool were done between each coat. This yields a very smooth finish. All wood parts were cut to fit and fitted in advance and were permanently cemented in place after being sealed.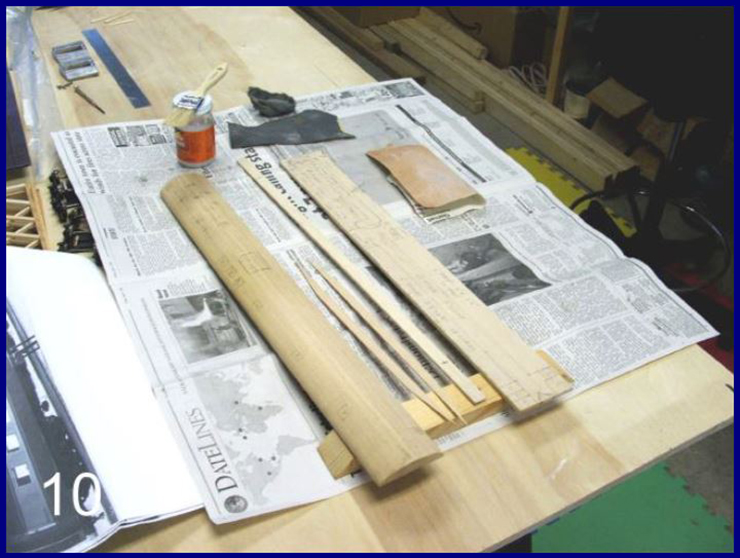
Photo 11. The car sides were spayed with dark green paint for ‘doping’ and fastened back to back with tape along the edges. The window and door openings were marked off with a scriber and machinists square. Here, corners for the main dining room windows are being drilled for both sides at the same time as they are opposite each other on the car. All other windows and door openings were similarly drilled in each side separately.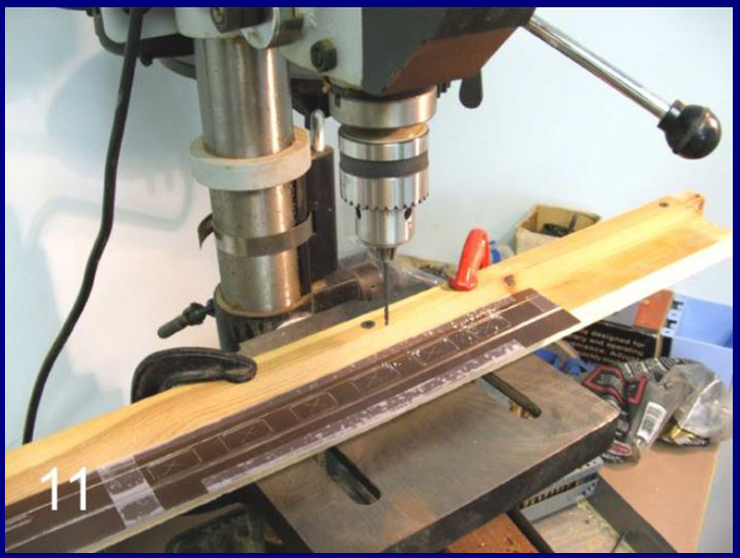
Photo 12. The window openings were fully opened with a Dremel tool and cutting wheel. They were dressed to size using fine cut files. This is slow, tedious work. Care is needed to stay within the scribed lines and to make certain all openings are perfectly square and that all the rounded corners are the same. Here, one side has been cleaned and filed to size. The other, still in green dope, awaits its turn. When both sides are ready, a strip of ¼” brass angle stock was cemented to the top inner side of each to stiffen it. These stiffener angles were located about ¼” below the top edge of each side as well.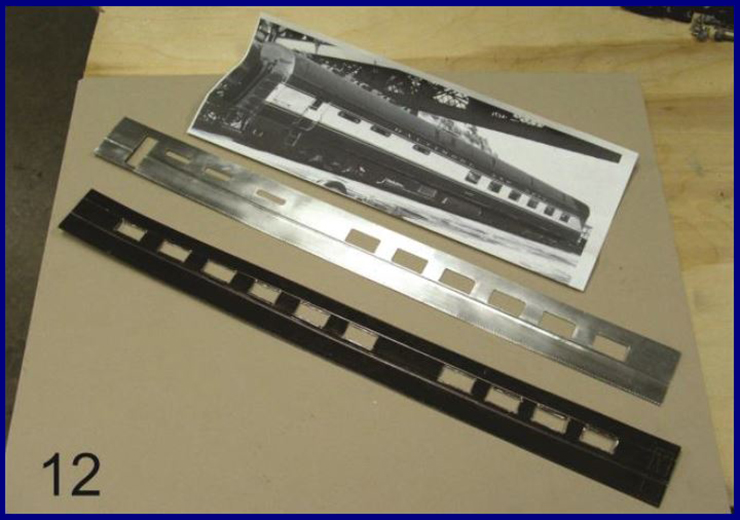
Photo 13. So how does it look so far? A pair of Golden Gate Depot Pullman type 2411 six-wheel trucks was put on and couplers installed. The car sides and roof were temporarily held to the floor and ends with rubber bands.
Track testing helps assure the car tracks properly with its couplers and floor, as well as the roof at the correct height. It’s much easier to make any changes and adjustments now, rather than after the car is finished! Here it’s rolling along between a Walthers B&O combine and a Golden Gate Depot B&O 12/1 sleeper. The white styrene strip was added to raise the roof slightly and also
detail the bottom edge of the eaves. An additional strip of aluminum was applied as the top plate above the car windows, following prototype practice on the 1035.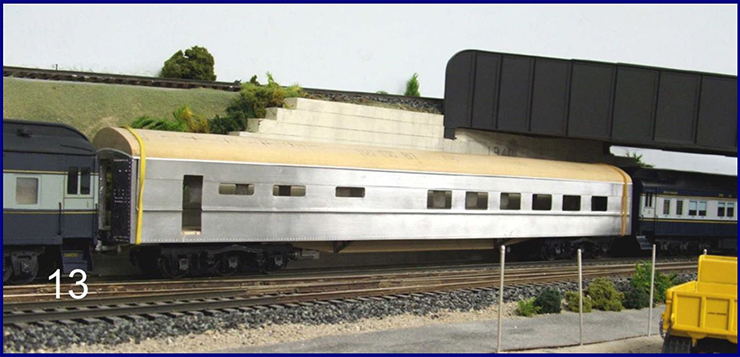
Body Details
Photo 14. Now for the smaller details and there are a lot of them! The underbody was detailed to show the prototype’s dual brake system and basic equipment as determined from the B&O diagram and photos.
Commercial parts were used for the two generators, dual brake system and cross bearers. The air conditioner, battery boxes and other items were made of wood with thin sheet aluminum or styrene coverings with detailed fronts. One air reservoir still needs to be installed as well as clevises, brake rods and the hand brake linkage in this photo. No water tanks are under the car. They were in the ceiling over the kitchen.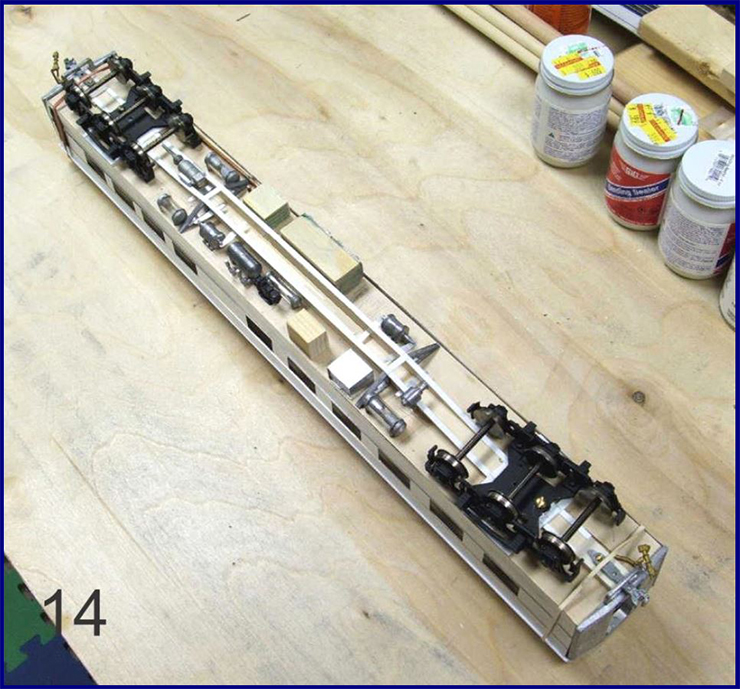
Photo 15. The 1035 has short end skirts at each lower corner. Here is how they were fashioned from some milled wood, soda can aluminum, strip brass for the stirrups and glue. One of these end skirts was made with a notch to fit the stirrup step for the side service door.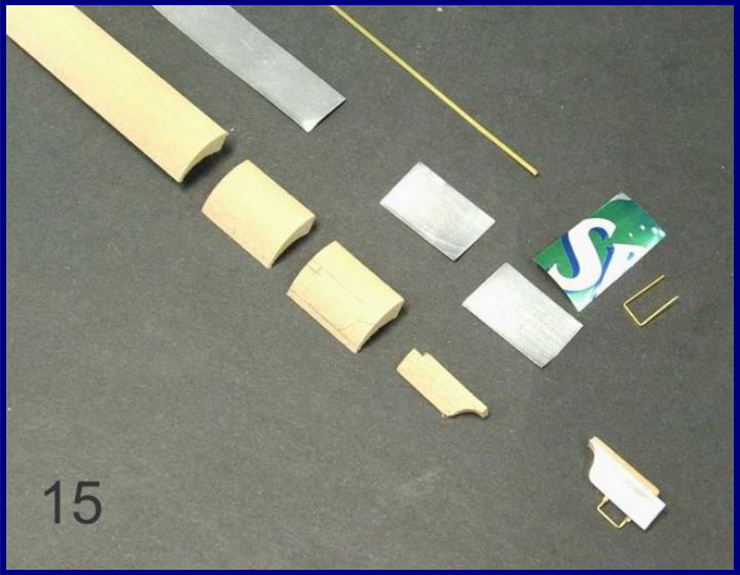
Photo 16. Roof details were next. Commercial louvered vent castings were bent to the roof curve and set into carved recesses. Two caboose stack castings were shortened to look more like those on B&O 1035. Styrene and sheet aluminum embossed with rivets were made into the air conditioning system access hatch.
Three ice hatches all the same size were cut from the same aluminum used for the car sides. Photos were used to locate these parts. Lacking measurements, it’s best to use photos taken at different angles. Then temporarily reset parts until they match with the same angles when looking at the model. To do that, I used bits of clay. The desired location was marked, and holes or recesses needed were drilled or cut.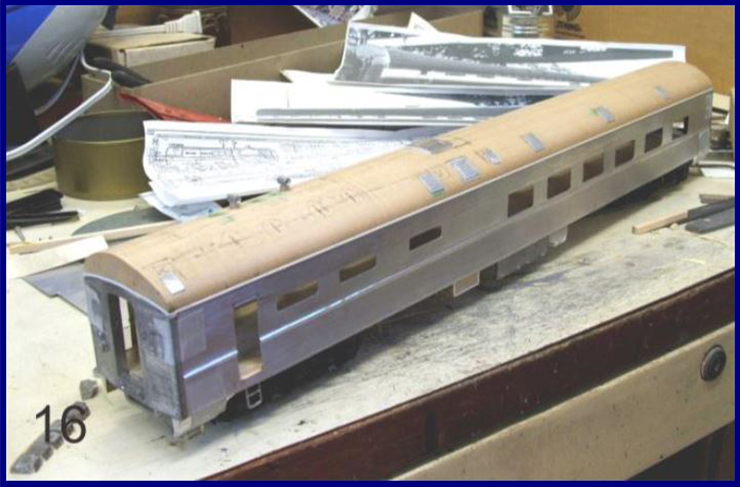
Photo 17. Doors on this model are made so that they are about scale thickness and detailed on both sides. Basically, each is a sandwich made with thin soda pop can aluminum on both sides with a styrene middle sheet the same thickness as the glazing material. The styrene filler has an opening slightly wider than the window openings in the door and is open to the top. After the door is assembled with door handles, push and kick plates as needed, the rubber gasket detail is outlined on both sides after painting, with a fine black Sharpie marking pen. A piece of clear glazing is then slipped into the top slot.
There are six doors on this model: two end doors, a plain side service door, a vented kitchen side service door, an interior door in the passageway beside the kitchen, and a door into the kitchen from the car end vestibule.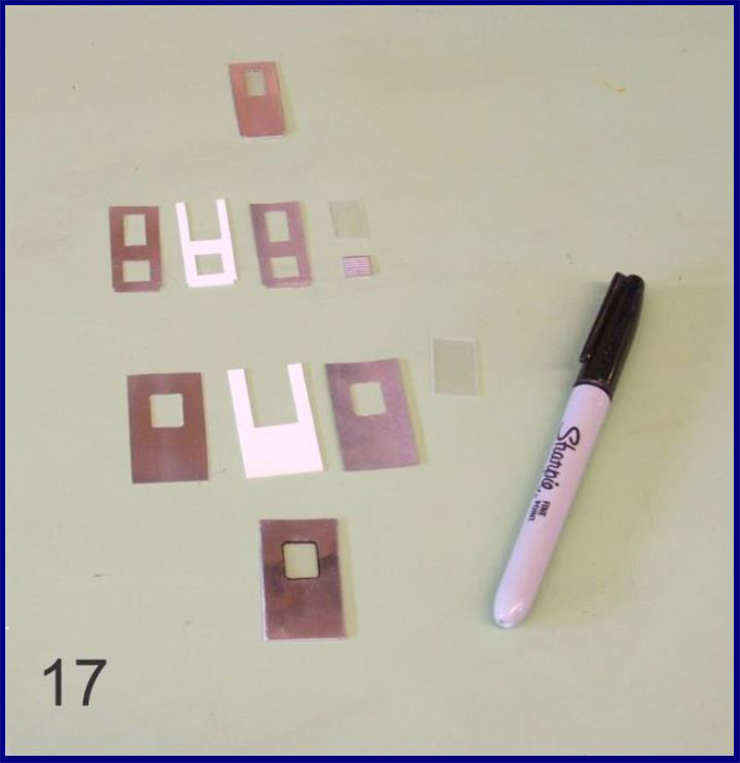
Photo 18. Next, seven ventilators for the kitchen and pantry were made by modifying commercial Garland vent castings. Their sides were narrowed by filing. Quarter round pieces of sealed stripwood were added to their backs. The bottoms of each were filed so they would sit level on the curved roof surface. As with the recessed vents, these were also located by trial and error with photo references. The range and broiler stacks were the most difficult to locate correctly, since they also had to relate to the kitchen equipment below them. Grab irons and rain drip rails were also added.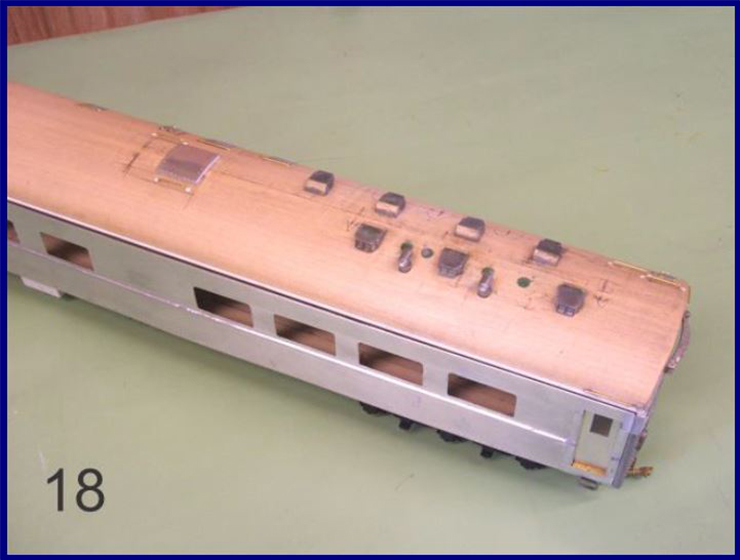
Photo 19. Car end details include diaphragms with top springs and anti-rattle rods, end grab irons, uncoupling rods, steam line, safety chains, brake wheel, air brake and communication hoses. As seen, the model is ready for exterior paint and lettering. The sides are not permanently mounted to the body yet. They are held in place by slots cut into the tops of large interior detail items. Permanent mounting will be done after the sides have been painted, lettered, glazed and detailed on their interior surfaces.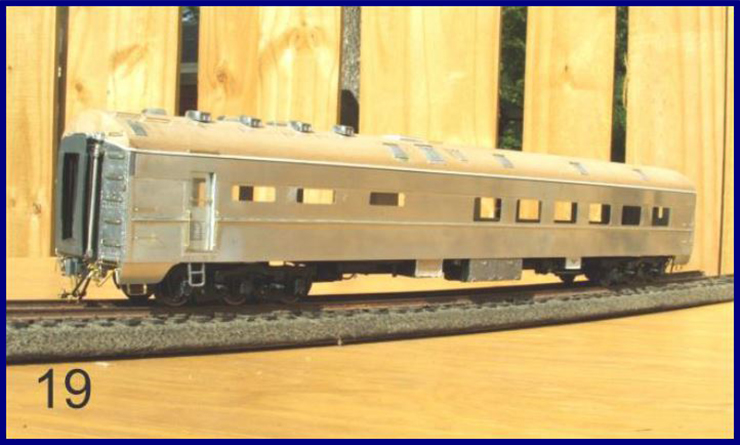
Photo 20. Painting with Scale Coat colors has been done and lettering with Micro Scale decals is underway. Doing this before the sides are on the car is much easier, especially in O-scale. Gaskets for the kitchen windows have been detailed with a fine black Sharpie marker. A similar silver marker was later used to outline the other car windows before glazing was installed.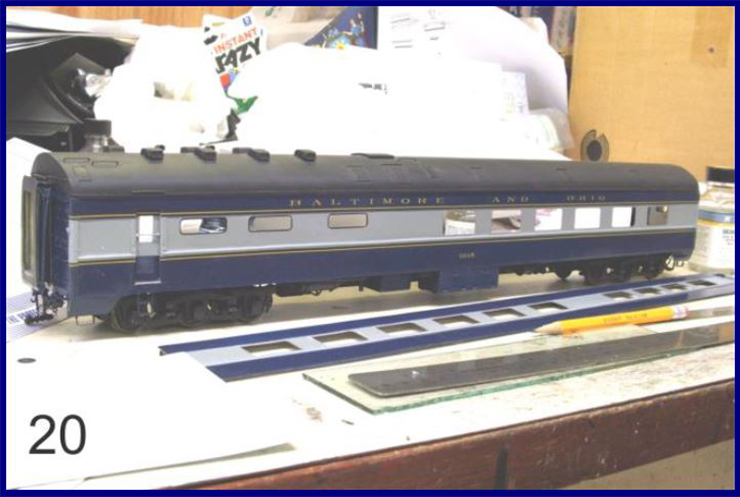
Interior Details
Photo 21. Interior detailing is fussy work. But for something to help show a collection of B&O dining car china, a fairly thorough job is needed. Items like the refrigerators and lockers are solid wood with detailed faces. They also help hold the interior walls in place, such as the kitchen/pantry/passageway wall. The wall was made in one piece with sheets of car side aluminum contact cemented to both sides of a sheet of styrene much like the doors were made. To model the rounded corners of the prototype’s wall, this ‘sandwich’ was held in a jig with clamps until the glue had set.
Tables were cut from heavy paste board card stock. 1/16” styrene angle was used for wall brackets and ceiling tile staples for legs. Carpeting in the dining room is dress material with a small floral print similar to what B&O used. The interior wall is paneled with wood grain shelf paper below the window sill line and antique white painted matt board above.
Drapes are pieces of ribbon with their cut edges secured with a no-fray solution available at fabric stores. The Venetian blinds were computer drawn to fit the windows and printed on overhead transparency stock. They were printed for me by a fellow B&O RR HS member, as my new printer would not take transparency material.
Since this car will be displayed with its roof open to show the interior, the ceiling was also detailed. To do this, part of the underside of the wood roof was cut away. The kitchen ceiling is sheet aluminum that has been scored to show panels and ventilator openings. It has a brace bent into one edge that fits beside the kitchen/pantry/passageway wall.
The passageway ceiling is painted sheet styrene. Holes were drilled in it for the light fixtures. They are modeled with slightly larger roundels punched from clear glazing and hazed on one side with fine sandpaper. Their edges were painted silver. The same was done for the square ceiling light in the reception area before gluing them in place.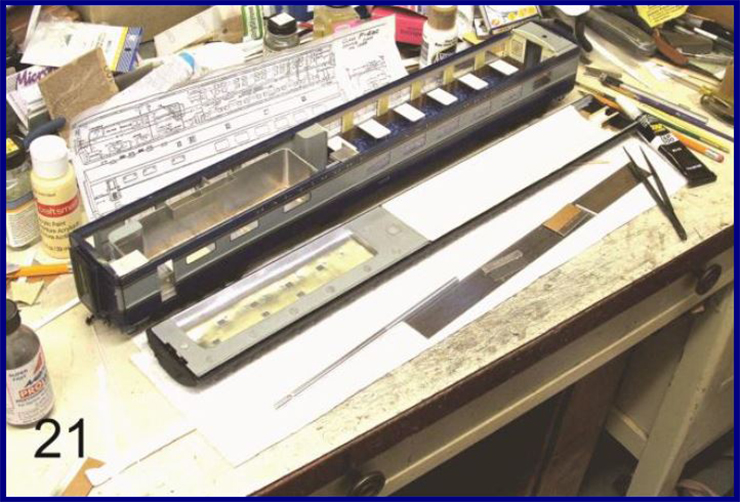
Photo 22. In the kitchen and pantry, work spaces include: the ventilator hood, steam table, counter tops, cabinets underneath and overhead, refrigerator and sinks. All were made with sheet aluminum or with sheet aluminum applied over wood bases.
In the dining room, table cloths made from tissue paper, folded and fitted are in place. They were probably the most tedious of any work done on this car! Bits of double stick tape hold them in place.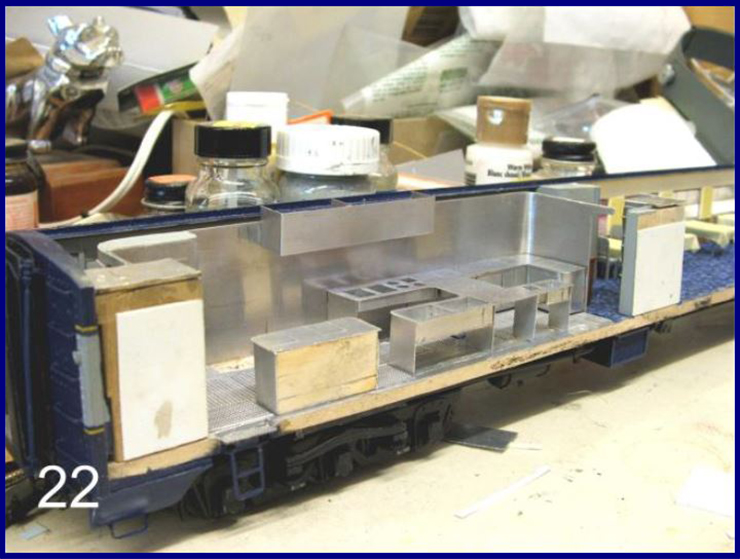
Photo 23. Here, the opposite car side interior wall is being completed. It shows the process of adding wall panels, glazing, Venetian blinds and drapes. For other detailing, the dining room end walls have framed and glazed prints of Fringed Gentian, the West Virginia state wild flower in honor of Betty Zane, even though her name is no longer on the car. The side board in the reception area is made of solid furniture grade walnut. A thin piece of glass doll house mirror is set into the wall above.
The kitchen and pantry floor are covered with printed a Roll-a-Grate pattern on glossy photo paper. These were expanded metal gratings that could be rolled up, taken out and hosed down for cleaning. If something spilled or fell to the floor while underway and cooking, it usually went down under the grating so no one could slip or fall from it. It stayed there until the run ended and the kitchen /pantry area cleaned.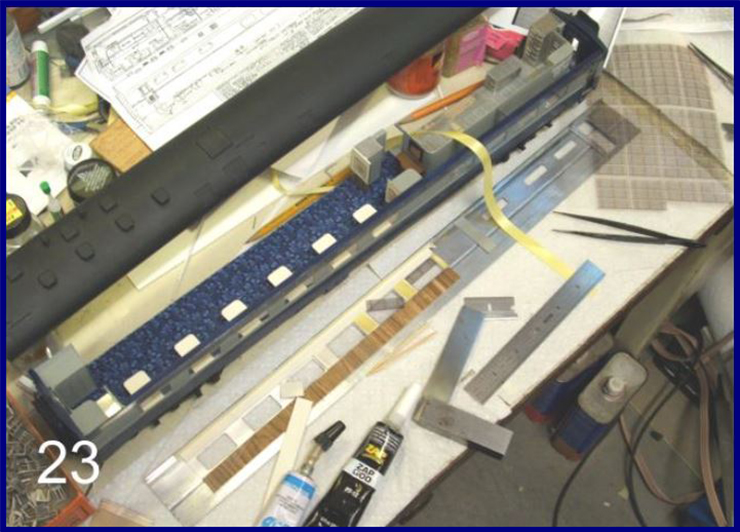
Photo 24. The kitchen window vents were computer drawn from a photo of an actual window vent. They were printed to scale size on photo paper. Each vent was cut out and its paper backing trimmed off to make it as thin as possible before gluing it to the glazing. These vents were applied to both sides of each window.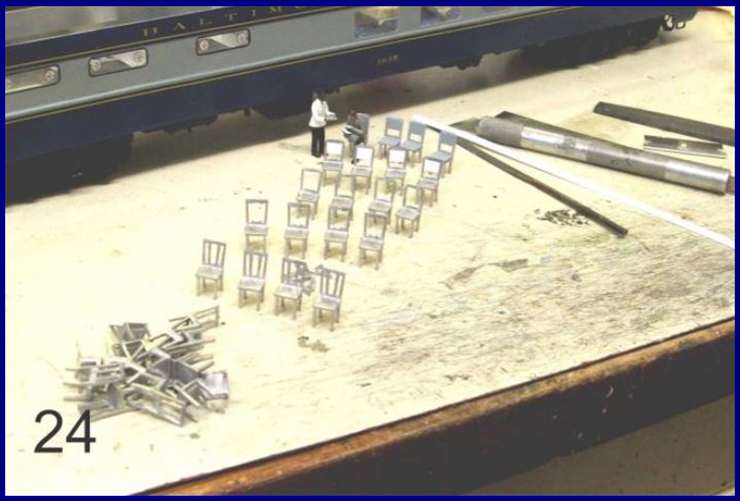
Photo 25. A big puzzle was: “What does a 1923 Stearns coal burning range and broiler look like?” Using the internet to find out was next to useless [and there was nothing in your editor’s 1937 Car Builder’s Cyclopedia.]. This kind of dining car or restaurant equipment was junk a long time ago and now forgotten. The Stearns Iron Works, then located in Syracuse, NY, was long out of business.
In checking photos of kitchens in other railroad’s dining cars, here is a result based on a similar 4’ long range and 4’ long broiler as seen in a 1920’s era N&W diner.
They are made in styrene with sheet aluminum and brass wire details added. Pot racks, warming oven, stove pipe with damper, safety rail and water outlet detail the range. There is a working hood, grate, fire box, a plate rack and plating shelf for the broiler. Below is space for the charcoal. Next to these are the transverse overhead cabinets and shelves that fit between the kitchen and pantry areas.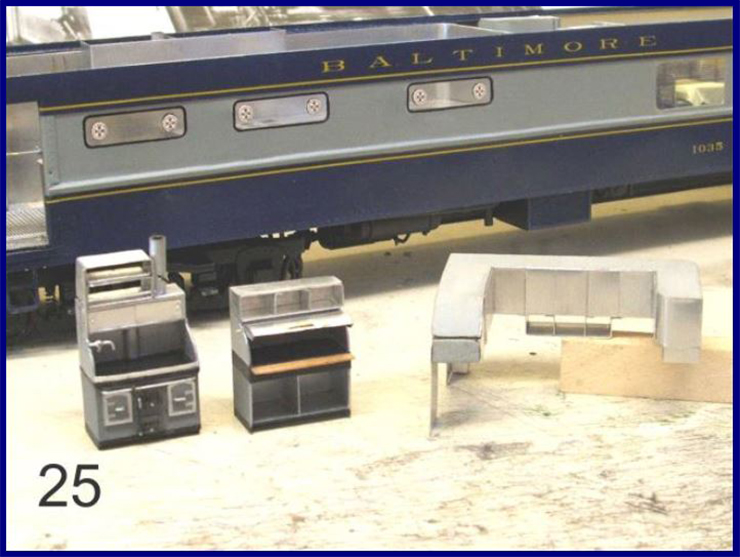
Photo 26. The kitchen equipment and cabinets have been installed. The sinks and steam table have water faucets. The interior side wall of the kitchen and pantry area has been detailed as well. The cabinet door ‘knobs’ are recesses made in the surface with a small drill bit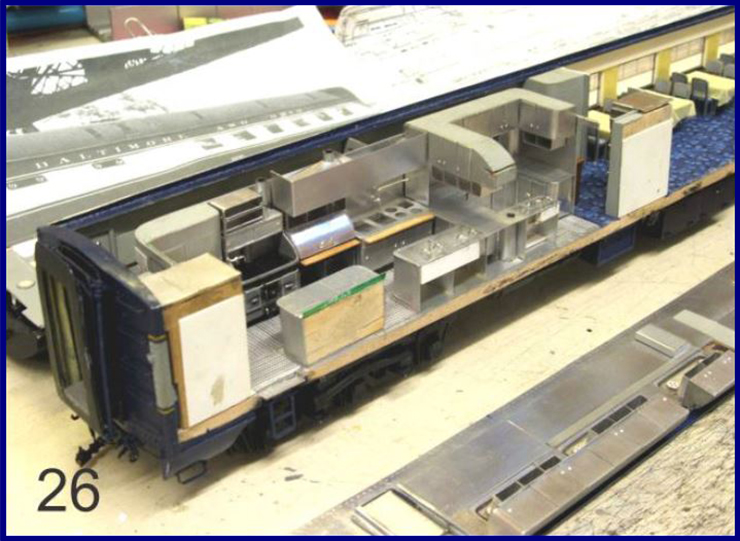 .
.
Photo 27. The 38’ 10” long dining room ceiling is a piece of heavy water color art paper. It was gently curled and detailed with a styrene strip down the middle to represent the air conditioning duct outlet. Antique white acrylic paint was applied.
Fluorescent strip lighting was modeled with 1/8” wide lengths of white styrene applied to the ceiling. Nine 1” lengths of 1/16” diameter white styrene rod were evenly spaced and cemented in line on them to represent 48” fluorescent tubes. Large diameter clear plastic soda straws from a drive-in were slit in half lengthwise and hazed with sandpaper and steel wool on their inner surface. They were fitted over the styrene strip and rods to be glued in place.
Other work shown here is making vases and rosebuds for the tables. A conductor’s punch cut out the bottoms from thin aluminum, long glass beads are the vase bodies, fine wire, two red beads and some ground green foam with a bit of glue does the rest. Twelve alike are needed. A larger vase with more flowers in it was made with bigger beads for the walnut sideboard.
Photo 28. In a B&O diner, one must not forget Deer Park water bottles on the tables! These were cut from a length of 3/32” diameter clear plastic rod cut 3/16” long with the top rounded off and polished. B&O used unique, clear Lucite pouring handles on them that fit around the base and snapped on over the top. A step too far here, I’m afraid!
There is a cabinet made in wood and sheathed in aluminum that fits under the counter space between the kitchen and pantry. It holds the B&O china sets and table ware assigned by the commissary to this car.
Photo 29. Next was a Hobart dishwasher for the kitchen/pantry area. The 1035 had a sizeable two bay sink. However by the mid to late 1950s, a number of state health departments were requiring three bay sinks if hand washing dinnerware was done. The third bay was for a bleach water rinse before drying.
Or, install a commercial dish washer that could properly sanitize everything by heat-drying. A photo of one that styrene and wire counter-top dishwasher unit was made and installed on the model after it was painted Hobart medium gray.
B&O dining cars had to pass restaurant and health inspections for each state they traveled though when serving food. Certificates of inspection were required to be publicly posted. They were displayed on the passageway wall near the vestibule
Photo 30. Finally complete inside and out, top and bottom is B&O 1035 showing the interior. Menus were added. A period B&O menu scan was reduced to scale size and printed on paper. They were cut, folded and glued in place at each table, between the bud vase and water bottle. Additional menus are on the sideboard. A small piece of fabric was fitted for the heavy curtain hung between the pantry and reception area.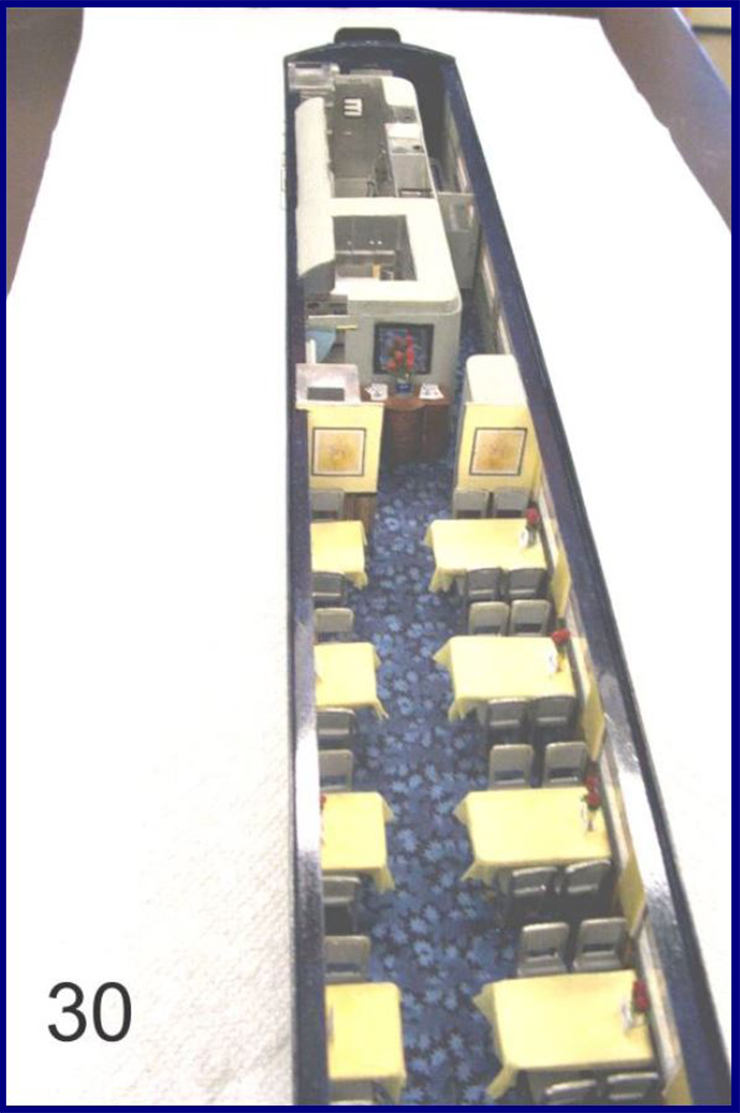
Besides building B&O diner 1035, a display board with ballasted track and a citation about dining car 1035 was made. Small wheel stops were soldered to the rails at each end so the displayed car would not roll off.