


Ed Bommer
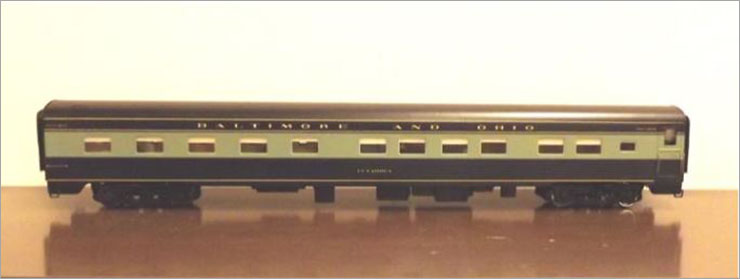
Fluted sides for B&O Class S-3a 10 roomette / 6 double bedroom sleeper ‘Cuyahoga’ by Golden Gate Depot.
In 2012, Golden Gate Depot introduced a line of O scale streamlined passenger cars made to model Pullman Standard’s post- WWII designs. With that, sets of smooth sided cars were made for B&O to model its two eight car post WW II “Columbian” train sets, including a dome coach for each. Golden Gate also made sleeping cars in B&O livery. The west-bound “Columbian” regularly carried a sleeper from Pittsburgh to Chicago.
Sold as extra cars was a 10 roomette / 6 double bedroom model made to Pullman Plan 4140 (bedrooms at the vestibule end with roomettes at the far end of car). One of these models was named “Cuyahoga.” While it’s an accurate name for a B&O 10/6, the prototype “Cuyahoga” had fluted siding below the windows. However the prototype “Cuyahoga” was built to Pullman Plan 4167. This plan had 5 roomettes at each end of the car, with the 6 double bedrooms in the center. The person who sent me this car to modify knew about this difference, but wanted fluting added anyway for use in his mid-1950s B&O Capitol Limited.
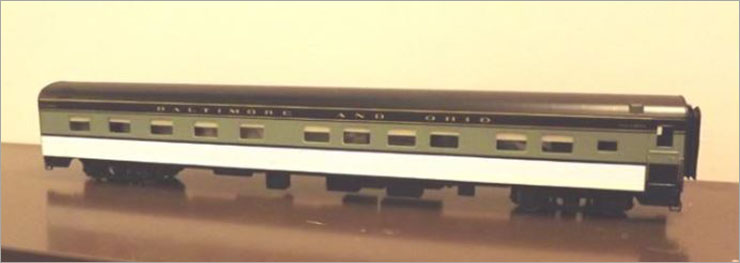
 Golden Gate Depot’s “Cuyahoga.” The Dulux imitation gold stripe under the windows has already been removed by careful scraping with a fresh X-Acto chisel blade. It is critical that the blue paint remains intact, as the fluted siding will be somewhat lower than the Dulux stripe was.
Also, the owner asked to have more passengers put inside the car. To do this required disassembly. Otherwise, this fluting modification can be done without talking it apart.
Evergreen styrene corrugated metal siding was used in two widths: .030” spacing for the narrow fluting (No. 14525) and .060” spacing for the wide fluting (No. 14527). These numbers are for the 12”x24” sheets, to be long enough to fit an O scale passenger car side. While they are .040” thick (1mm), thinner stock no more than .030” thick would be better but is not available. The narrow fluting is used for the bottom sill, about 3/8” wide or having 6 – 7 ridges. The upper fluting is wider and the total width may vary depending on the prototype. It is usually ½”, or 8 -9 ridges wide.
 The styrene fluted siding has been attached to the car side with Walthers GOO, set up as contact cement. This is, a thin coat on the car side and inner surface of the styrene fluting that has been allowed to become almost dry.
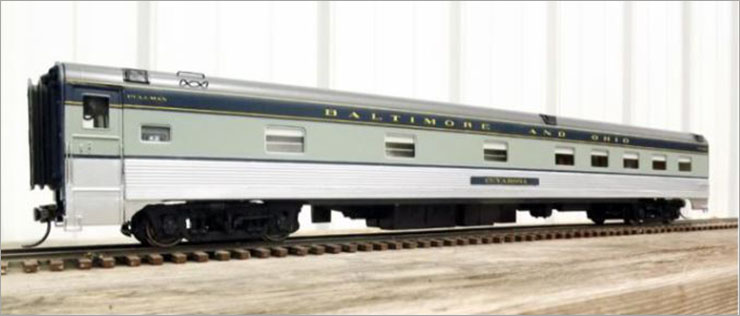 Here, the siding has been painted aluminum, with a new plate and car name attached. The two sizes of fluting also show better in this photo. Aluminum paint was also carried over the vestibule doors.
 Opposite side of “Cuyahoga.” The original side grab iron had been removed and replaced over the fluted siding. The new name plate is a strip of .010” thick aluminum which was painted B&O Scale Coat Royal Blue. The “Cuyahoga” is from a Microscale decals B&O passenger car set.
Kadee 700 series long shank couplers were installed after removing the shorter shank Kadee 805 couplers on the car. The same coupler mounting pads were used but turned around to be set farther in on the car end. Doing this enabled the long shank couplers to fit perfectly.
Earlier I mentioned taking this car apart in order to put in additional passengers. There are several screws which hold the ends and bottom plate to the extruded aluminum car body which need to be removed. Keep them separated as to location, since lengths may differ.
Extracting the stamped metal car floor from this body was exceptionally difficult. Once apart, the lower edges of the car body were almost 3/8”narrower than the inside width at the eaves line.
I set the car body into a large vise with wooden strips to protect the paint. I used another piece of wood as a pry lever to gently spread out the bottom edge of the car side. Care must be taken, as the extruded aluminum in such a tempered state could possibly crease or even crack. I worked one side, then turned the extrusion around to spread the other side. I managed to get the difference between the floor width and eaves width to be within 1/8 “.
To get the floor back into the car, I made four 1/8” x 1/8” wood strips the width of the metal floor to be used as spreaders. I applied some auto paste wax to the contact area for the metal floor in the body extrusion. With all spreaders in place to widen the body, the floor was slid back into the body, removing each spreader as it went. It was still a very tight fit! I included the spreaders and disassembly instructions with the model when shipping it back to the owner.